If you’re anything like me, then looking at the night sky brings a lot of joy (assuming the clouds have stayed away)! The trouble is, the moment you get the camera out, it’s not as easy to capture interesting images. The results look flat and boring with no detail. So what do we need to bear in mind?
I’ll try and run through the basics, but be warned, the rabbit hole runs very deep indeed and there is no way I can cover every aspect of astrophotography in this blog.
Everything manual
The first thing you’ll have to adjust to is setting your camera to manual for everything. This can be quite daunting if you’re used to setting a lot of things to auto, but is absolutely necessary. You will have to use manual focus, and you will have to make some decisions about exposure length and aperture that your camera is not capable of doing for you. Even the brightest stars are actually quite dim.
Choosing a lens
The faster your lens the better. And a wide angle will really help for your first forays. I will get into the reasons for that in a little while. But trust me, learn with the widest and fastest lens you own. Prime lenses are usually better too, but if you only have a kit lens or zoom lens then that’s fine. Just be aware that the problem with zoom lenses is that they tend to make compromises for focussing the different wavelengths of light. This is usually ok for terrestrial imaging, but can lead to some odd chromatic aberrations when you’re imaging the night sky.
I personally use a 50mm f/1.4 or a 16mm f/1.4 to get nice wide shots. You’re not going to get the detail on deep sky objects, but that can come with practise.
Finding focus
This can be tricky because you can’t use the autofocus on your camera. There’s just not enough light for the camera to work things out. Stick your camera on a sturdy tripod and point it at the brightest star in the sky. In the northern hemisphere that will often be Polaris or Sirius depending on the time of year. Avoid using Venus or Jupiter though by accident as this can lead to unexpected results. (Stars are point light sources, planets are not). Set your camera to manual focus, and use the screen. If your camera does focus zooming then use that too. Twiddle the focus ring until the star is at its smallest in the viewfinder. That should be in focus then. It can be quite fiddly to do this. Once you’re happy with the focus though, use a piece of electrical insulating tape to firmly tape down the focus and zoom rings so you don’t knock them.
What settings?
For traditional terrestrial photography we often let the camera decide on the length of the exposure, depending on the aperture etc. For astrophotography we need to make this decision ourselves. And in fact, we need to start with the exposure time.
The earth is constantly moving. Quite quickly in fact. As a result, the stars are never in the same spot. The longer your focal length, the quicker they will seem to move too. At 350mm on my camera the stars I have framed up will be out of view within about 15 minutes.
So we actually have quite a limited amount of time to play with. We’ll take my 50mm as an example.
If we’re happy to have slightly elongated stars then there is a rule called the 500 rule:
500 / focal length = shutter speed.
In the case of my 50mm lens, on an aps-c sensor, that gives us
500 / (50 * 1.5) = 6.7s.
I would usually round that up to 7s for simplicity. That means the longest I can leave the shutter open for is 7s per image. Not long at all.
If you want to have pin sharp stars though, the story gets even bleaker. There is a rule called the NPF rule. I won’t go into the details of the calculation here because it’s complicated, but that tells me that I can only go as far as 2s per exposure at f/2.0.
Both of these rule calculations are available in a very nifty app called Photopills under the “Spot Stars” option. It takes all the drama out of the calculations.
In order to get lots of detail you therefore need to compensate with your ISO setting. But then we introduce noise, and in some cases lots of it. With my 50mm lens at f/2.0 and 2s exposures I know I can get away with using ISO800. That’s not too bad. But with my 350mm lens at f/6.3 and 1s exposures I have to push that to ISO6400.
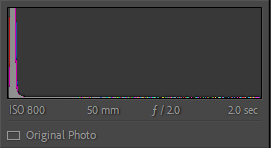
How did I come to these ISO settings? Mostly trial and error. But there are some things to look out for. The best way to decide what ISO to use is to take a test image at a given ISO and then to look at the histogram of the resulting image in your camera. You want there to be data registered, but you want it to all be over very much on the left hand side. If the data starts to encroach too much past about 1/4 of the way to the right you will run the risk of blowing out the star details in post production. You also want the bulk of the histogram to not be quite touching the left axis either otherwise you will lose detail as it’s too dark. This is almost perfect:
Single exposures start to look terrible when you push the ISO. So what do we do?
Multiple exposures
This is where multiple exposures come in. If you take a large number of high ISO shots and stack them using dedicated software, then you lose the noise and gain detail. But we’re talking a lot of shots. In some cases thousands of them. So be prepared for a lot of post processing. And you’ll need an intervalometer as well otherwise you’ll be pressing a lot of buttons!
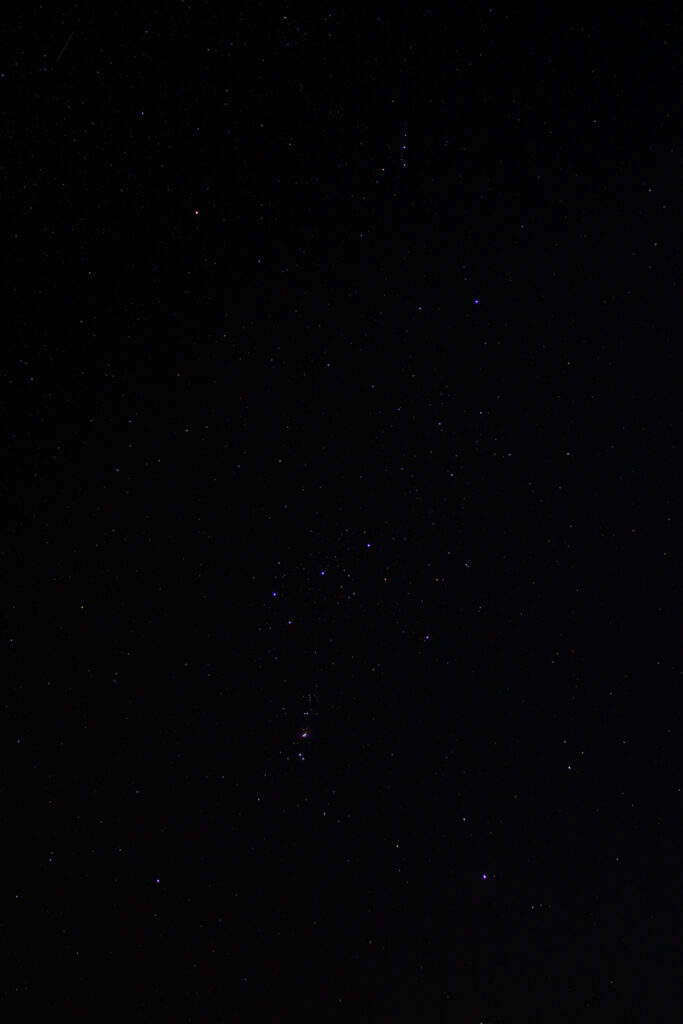
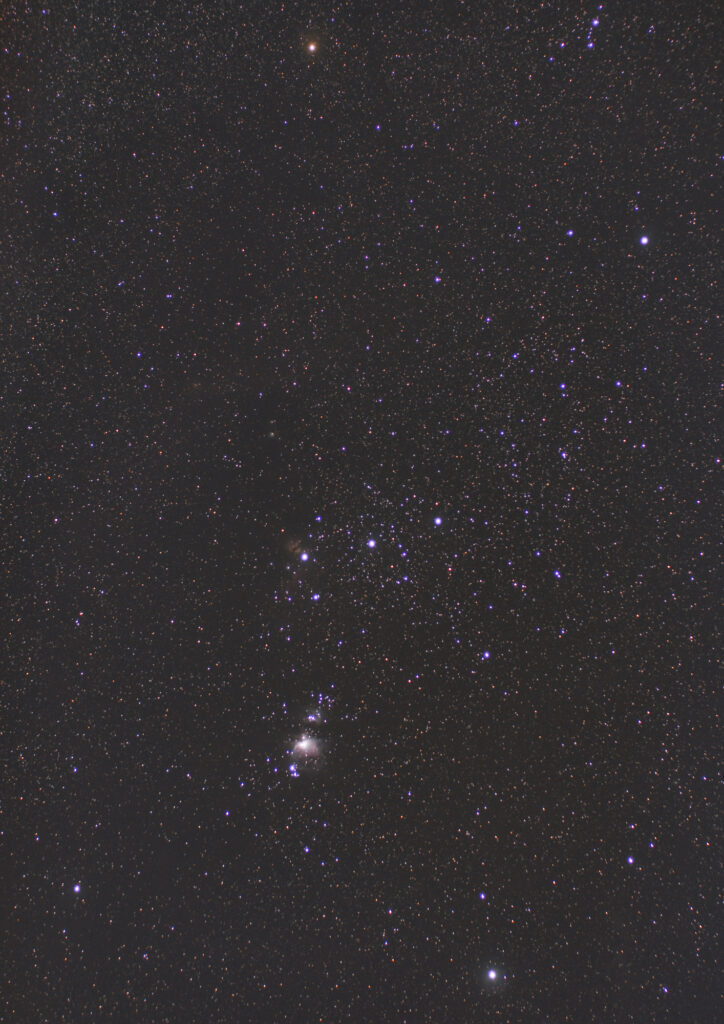
The more images you take, the more detail you will have in your resulting image. My image of Orion below is over 1000 images (subs), each at 2s. I’ve also added an example single image for you to see the transformation.
You can also add files called Flat Frames, Dark Frames, Bias Frames, but these are beyond the scope of this little guide. They are used for removing camera noise, dust motes, vignetting etc. You will want to start taking them as you get deeper down the rabbit hole, but not for now.
Editing/Stacking
Personally, I use a program called Deep Sky Stacker to stack my images that only have sky in them. If your images also have a foreground then I’ve found that Sequator does a much better job.
Once your images are stacked, then you’ll need to “stretch” the data in the resulting image to bring out the detail. Again, this isn’t something I can explain in text form, but there are lots and lots of guides on Youtube to help. Nico Carver (Nebula Photos), and in particular this video, is an excellent source of inspiration and guides to astro processing. He puts things in a much better way than I ever could.
Summary
I hope this guide is informative and a useful starting point. Essentially you need to
- Focus
- Select a target
- Calculate exposure length
- Work out the best ISO
- Take LOTS of images
- Process
Please enjoy the technical challenges, and Clear Skies!